I’ve recently finished publishing the #DigitalAI campaign showing off Digital AI, and it’s been well received. Inspired by the desire to track consumers onto competitor websites, Digital AI was born. For this post, I am going to review the history of the Digital AI product and the tools it provides to enable you to track your customers onto competitor websites. The topic has been written about a lot, and I intend on adding additional clarity. If digital tracking, dynamic numbers, and tracking consumers who defect from your website is something you want, sign up to learn some more.
Tracking customers on your competitor’s website.
You can deploy certain tricks to track users across domains, devices, browsers, and time but there are limitations in tracking codes. Since you are limited to what you are currently using, let’s attempt to solve the problem of tracking consumers onto your competitor’s website with what you are already using. Before going down this rabbit hole, I want to add that we offer a solution for this, packaged up and ready to go, called Digital AI.
The fundamental problem with competitor tracking is ownership.
Since all the tracking codes embedded on websites all over the web are running all the time, you’d think that there would be a way to find out what happened after consumers leave your website. The short answer, sorry… you don’t get to see it. Why? You see, the reason you do not get to know is that you may only see data from tracking codes that you own and utilize. It would require you to have your tracking code installed on every website to get all of that tracking data.
Frustrating, right?
Well, then how do websites obtain competitor data? At least for now, as of writing this, everyone’s information is considered private. The web browsing data across the internet is tracked by dozens of big data companies who have access to every businesses’ competition, but that information is protected by privacy laws.
For the most part, an individual’s data is private, secure, and encrypted. When large data queries are made to analyze the data and pull out insights into competitor’s, every user is made as anonymous as footprints in the snow. This means that marketing research and analytics tools can have access to trackable data, but at a steep price for those with deep pockets and access.
Here are the basic steps you can follow to widen your tracking capability:
- Switch to a Tag or Code or Pixel Manager
- Utilize Cross Domain Tracking
- Improve The Quality of Data with Custom Dimensions
1. Switch to a Tag or Code or Pixel Manager
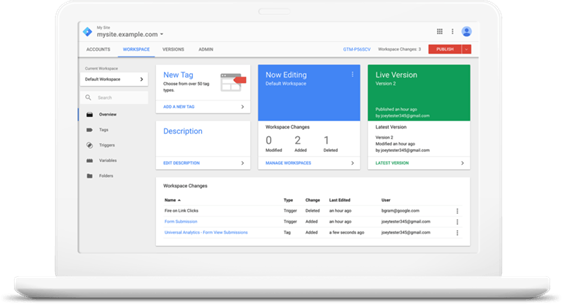
The most common manager is Google’s Tag Manager. I will refer to this as that is what I have been using for years and it allows me to make manageable changes and customizations to a vast amount of websites.

I would recommend that you take the time to set it up with the best practices of implementation including conventions, standards, protocols, etc. The result will be a single-stop-shop of all things tracking.

2. Utilize Cross-Domain Tracking
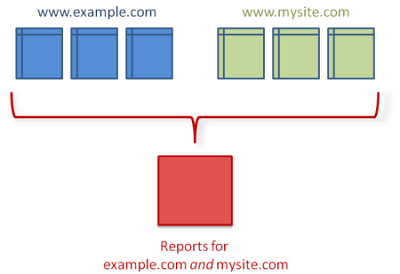
I will again reference this regarding Google Tag Manager because that is what I have been using and what I know best. Before you can start utilizing Cross Domain information you need to set up your tracking code to allow for it. You’d want Cross Domain tracking if you want to track individual users that hop around on your websites. The alternative is that every visit will be seen as a unique user and your traffic numbers will be inflated with artifacts.

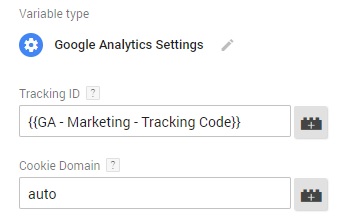
Within Google Tag Manager, using the newer interface of creating a Google Analytics Settings Variable, you will see the Tracking ID field, and the Cookie Domain field, at the beginning of creation. I am skipping beginner steps here to focus on the ability to implement cross-domain tracking between websites you own and have tracking codes on.
The setup for one of our variables may look familiar. The value you want to consider is the cookie domain field, entered as “auto.” Second, you will drop down More Settings, and Fields to Set to allow inter-linking as shown below:

In the field value, type “allowLinker” or select it from the list that will appear. Enter “true” for the value. Now you are ready to add your referral websites. I will give you a shortcut after I explain.
Referral lists are the URLs of the websites that you own with tracking codes that will be sending traffic between them. This is done to facilitate the cross-domain transfer of individual users between the sites you list. So gather up the list of your websites and write them down. We are going to add them to a constant in Google Tag Manager.
![]()
The final field in the Google Analytics Variable is the Auto Link Domains field. Here you will click the grey “add” block on the right and add a constant. In the constant value add all of your website domains and subdomains one after another, separated by commas. Example: “callsource.com, marketing.callsource.com.”
Taking control of your Cross Domain tracking ends inside your Google Analytics. Navigate to your Google Analytics, and within each website, you need to add referrals to all the others.
This sounds tedious. It is.
There are workarounds, but this is the manual approach.
The referral exclusion list is located in your administrative panel, under the property, and finally nested under Tracking Info. I feel for you if you have over a hundred websites, I really do. For most of us, there might only be one to twenty websites to add and keep track of.

Once you have added all of your websites here that could be sending traffic, you are done. You should be tracking multiple sites now and that traffic will not fall under referrals and will be associated across domains that you own. It’s a work of beauty.
3. Improve The Quality of Tracking Data with Custom Dimensions
This final step is a deep-dive, and if it’s worth the effort for you to learn this, I would ask why you haven’t considered trying out Digital AI. I need to add that this last section contains information that I am sourcing from a heavy hitter in the analytics industry named Simo Ahava.
I will summarize and interpret the information from his extensive post for you. Essentially, there are ways to log extra data into your google analytics that will be useful in adding depth and dimension that is unprecedented.
Custom Dimensions are fields that can exist in Google Analytics with values that you set, without requiring the API. Instead, we can use Google Analytics to run scripts and generate values from the information that is scraped off the cookie and page and inject it into the tracking code. These custom dimensions will then show up on your dashboard after a few days, and you can run reports on it.
The 4 Custom Dimensions that Simo refers to are:
- Client ID
- Session ID
- Hit Timestamp
- User ID
Client ID

The Client ID is based on the session metric that is a value already created by Google Analytics. Google Tag Manager can be set up to extract this value and added to the Custom Dimension. Gathering it does require custom JavaScript and loading triggers based on events… so it’s somewhat complicated. Unless you have it in a custom dimension, you cannot pull this data out of Google Analytics or filter it in any way since it is not exposed on the front end.
You would want to know this to get more detailed session information out of your users. Do not go through the trouble of getting this unless you plan on utilizing it. This leads us to the next Custom Dimension…
Session ID
The Session ID is also based on the session metric but is randomized in the way Simo is using it. The values are grouped into sessions, but they blend together in the front end. The only way to identify if two distinct visits belong to the same session is to ungroup these sessions.
Hit Timestamp
Unlike the two Custom Dimensions before it, this dimension is hit-scoped, meaning it will be based on logged in visitors. Simo points out that this is done for privacy reasons so that I would stick with a hit-scoped method. The hit scope does require users to be logged in when they are visiting to get these metrics. You may be able to get this information by switching to a session or user-scoped view, but that is a “grey area,” as Simo says.
This value is found in Google Analytics but is not passed into the reporting. The value represents the exact moment that a tracking code is fired. You can use this to verify databases but also to see discrepancies between collected times and reported times.
User ID
The final Custom Dimension is the User ID, from the Universal Analytics tracking that groups together the fires, sessions, and Client IDs. The reason you would add this is to tie everything you have done so far all together. The User ID matches a user to their session and timestamp by the Client ID. If you have a very complex network of web pages… these four methods allow you to merge them into a clearer picture. You should know that users are not the most accurate to begin with, which is why robust solutions are created to clean it up.
In Summary
Check out Digital AI if you want a customized solution that is a white glove and built for you with cross-domain, cross-browser, cross-device, and even cross competitor tracking built in. Avoid having to purchase large ticket competitor research or even highly complex solutions to tracking and tagging.
If you must, I have outlined a detailed way to set up your website tracking for multiple sites of deployment using Google Tag Manager. Also, you’ve been shown how to add cross-domain tracking to your websites using that same tool. Finally, we did a deep dive into Simo Ahava’s solution for cleaning up the artifact-laden User information passed into Google Analytics using Custom Dimensions.
There are elements to help you improve your tracking so you have cleaner data that you can confidently say represents your actual web traffic. You can use this information to validate traffic counts no matter what business or model you deploy. If you have more tips, questions, or want to anything, you want to share? Go ahead and add it to the comments below.

